Generate dynamic Open Graph images in Next.js
This tutorial is written using the page router, the steps to follow may be somewhat different in the app router.
If you have ever paid attention, there is a very useful functionality in most social media sites like Facebook, or Twitter X, and it is that when an address is written it automatically loads a preview of the content of that address, being in most cases a card with an image and the title of the publication, for example:
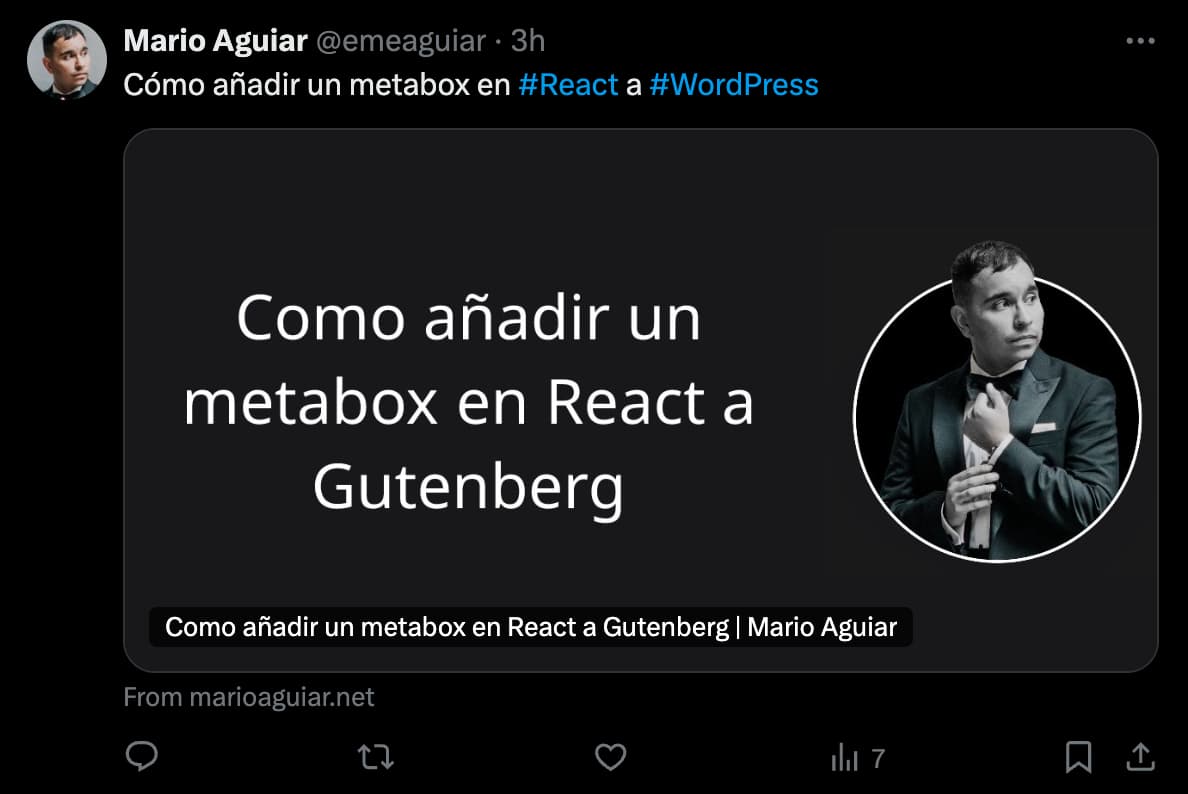
These cards are very useful because you can show a preview of the article so that your readers know easily and quickly what your link will be about, in most cases you can use custom images for each article, but this becomes tedious (besides that logically it will consume time,) so for this blog I decided that I wanted to use a simple template and that only the text shown in the image changes.
Of course, I could save the template in Photoshop and simply update it with a new text each time I publish a new article, but this brings me two problems:
- As mentioned earlier, it is the loss of time that results in creating a new image for each post
- Each image needs to be uploaded to the server, which generates loss of space
Fortunately, I found a fairly simple way to create dynamic images for Open Graph in Next.js, below I show how I achieved the result of this Blog.
Open Graph?
Open Graph is a protocol originally created by Facebook to standardize the use of metadata (data from a site,) for use by other sites, in other words it allows many sites to consume some data from your site in a predictable way, so as not to have to guess where to get each thing.
I won't go into much detail about the protocol itself, since we only need a title and an image for this tutorial, but if you have any questions don't hesitate to contact me ☺️️.
STEP 1: CREATE THE ROUTE IN REST
In broad strokes, what we are going to do is create a route in rest that generates the image we need automatically based on the title we send, so we simply link the route with the necessary parameters to our open graph tag.
We start by creating our file, this should be located in pages/api/og.tsx.
To create a route, all we need to do is add the following code to our file:
1/**2 * Next.js dependencies3 */4import { NextApiRequest, NextApiResponse } from 'next';56function handler(7 req: NextApiRequest,8 res: NextApiResponse9) {10 res.status(200).json({ message: '¡Hola Mundo!' })11}1213export default handler;1415
Now if we open the route at http://localhost:3000/api/og we will find a small JSON code, which is exactly what we sent to our route:
1{"message": "¡Hola Mundo!"}2
Here is where we will place our images, so now that our route is created, what we need to do is use the magic of ImageResponse1
Where are my styles?
You may have noticed from our JSON response in the browser it doesn't have any other components or any of the styles that our site should have. This happens because the /pages/api folder is special in Next.js, it tells the compiler that everything inside is in a separate section of our site (the rest routes) and that it should form its own response.
STEP 2: CONVERT A COMPONENT INTO AN IMAGE
What ImageResponse does, in a nutshell, is convert any component into an image before displaying it in the browser. This is precisely what we need since it allows us to place the title we want inside our image, here is where the magic happens.
Starting from our previous code, we will make some modifications to return an image instead of our JSON:
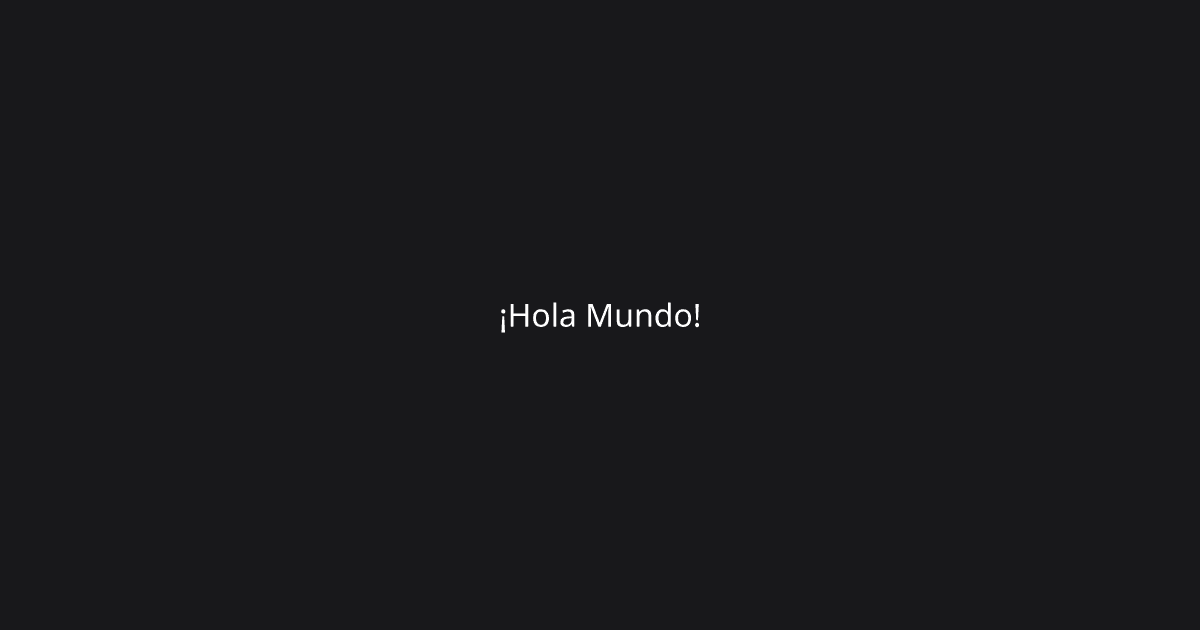
1/**2 * Next.js dependencies3 */4import { ImageResponse } from 'next/og';56/**7 * Necessary to avoid an error8 * when running in the Node.js runtime9 */10export const config = {11 runtime: 'edge',12};1314function handler() {15 return new ImageResponse(16 (17 <div style={{18 alignItems: 'center',19 backgroundColor: 'rgb(24 24 27/1)',20 color: 'white',21 display: 'flex',22 justifyContent: 'center',23 height: '100%',24 width: '100%',25 }}>26 <h1>¡Hola Mundo!</h1>27 </div>28 ),29 {30 width: 1200,31 height: 630,32 }33 );34}3536export default handler;37
When we see this:
1{2 width: 1200,3 height: 630,4}5
We are referring to the size the final image will have, this can be any size you want but 1200x630 is common in Open Graph.
Now if we open our API page, we will see this in the browser:
As you have probably noticed, we are using the style attribute directly in the component. This happens because as we cannot load any styles in the image, we must include them directly in the component.
This works very well in most cases, but it has limitations, make sure to check the documentation to have a list of functional properties.
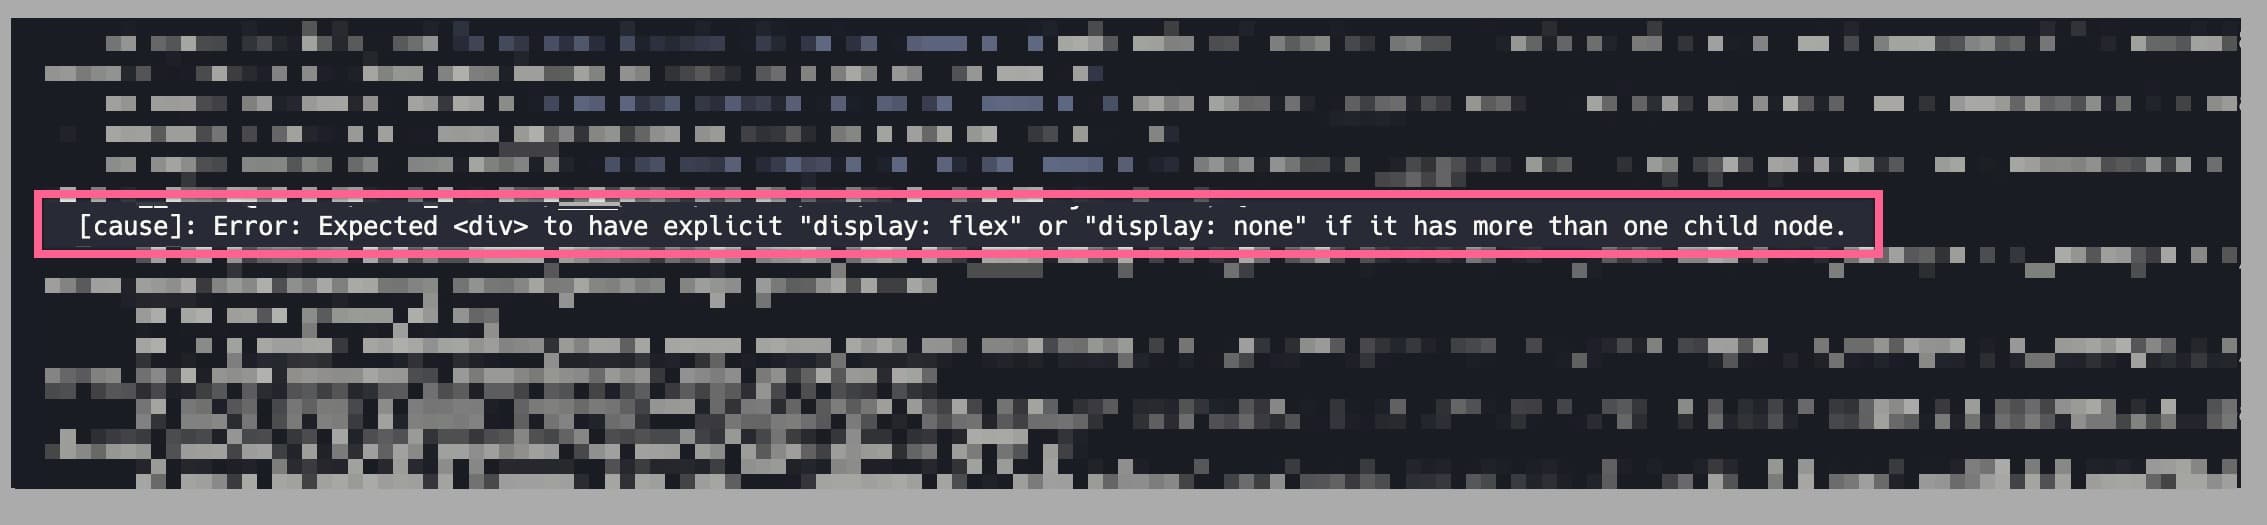
In some cases, when you return more than one component, if you have an error and the image does not load, try adding display: flex explicitly to the parent element (as I did in the previous example). Errors can be quite difficult to find but you will find a log in the console if you are in development mode.
STEP 3: ADDING STYLE TO OUR IMAGE
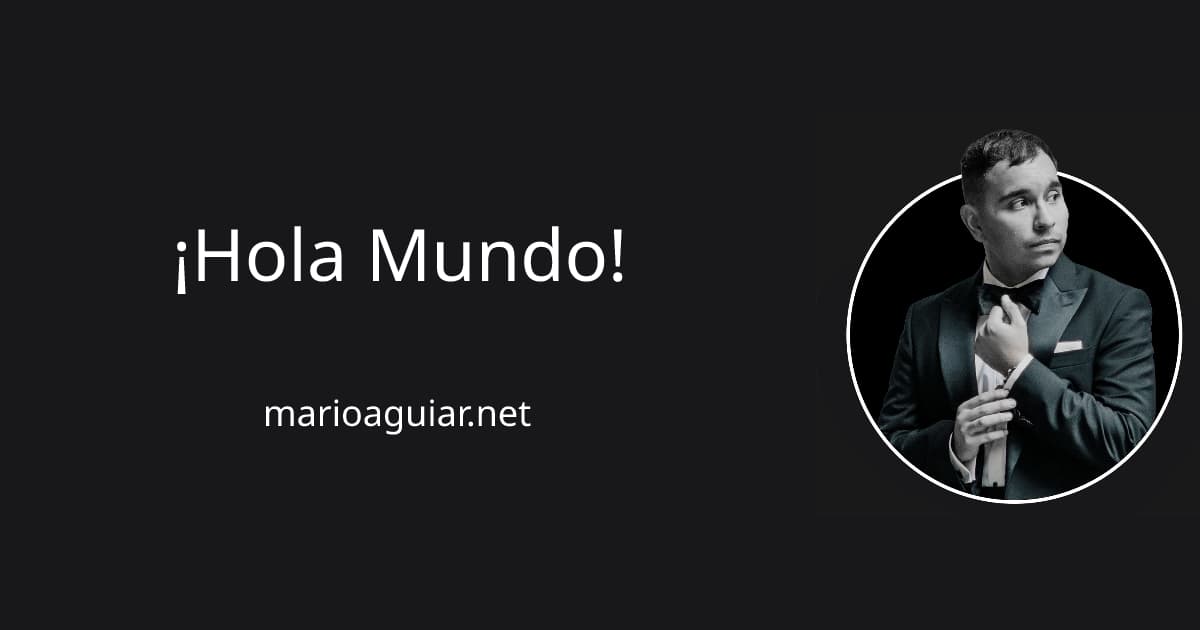
We are almost ready, we just need to add a little more style to our image, and since we will simply convert a component into an image, there is nothing stopping us from adding another image as well:
1/**2 * Next.js dependencies3 */4import { ImageResponse } from 'next/og';56/**7 * The img tag needs an absolute URL8 */9const SITE_URL = 'https://marioaguiar.net';1011/**12 * Necessary to avoid an error13 * when running in the Node.js runtime14 */15export const config = {16 runtime: 'edge',17};1819function handler() {20 return new ImageResponse(21 (22 <div23 style={{24 backgroundColor: 'rgb(24 24 27/1)',25 display: 'flex',26 fontFamily: 'Raleway, sans-serif',27 gap: 16,28 }}29 >30 <div31 style={{32 alignItems: 'center',33 color: 'white',34 display: 'flex',35 flexDirection: 'column',36 fontSize: 36,37 height: 630,38 justifyContent: 'center',39 padding: 16,40 textAlign: 'center',41 width: 800,42 }}43 >44 <h145 style={{46 fontWeight: 600,47 }}48 >49 ¡Hola Mundo!50 </h1>5152 <p>53 marioaguiar.net54 </p>55 </div>5657 <div58 style={{59 display: 'flex',60 alignItems: 'center',61 justifyContent: 'center',62 }}63 >64 <img65 width={400}66 height={400}67 src={`${SITE_URL}/mariobw-og.jpg`}68 alt='Mario Aguiar'69 />70 </div>71 </div>72 ),73 {74 width: 1200,75 height: 630,76 }77 );78}7980export default handler;81
STEP 4: ADDING POST DATA
Finally (and the point of the whole tutorial really,) we must add the data of our post to the image, and for this we simply need to modify the code a bit to receive parameters and use them in the image:
1/**2 * Next.js dependencies3 */4import { ImageResponse } from 'next/og';5import { NextApiRequest } from 'next';67/**8 * The img tag needs an absolute URL9 */10const SITE_URL = 'https://marioaguiar.net';1112/**13 * Necessary to avoid an error14 * when running in the Node.js runtime15 */16export const config = {17 runtime: 'edge',18};1920async function handler(req: NextApiRequest): Promise<ImageResponse> {21 // Receive the parameters from the URL.22 const { searchParams } = new URL(req.url || '');23 const title = searchParams.get('title') || 'Mario Aguiar';2425 return new ImageResponse(26 (27 <div28 style={{29 backgroundColor: 'rgb(24 24 27/1)',30 display: 'flex',31 gap: 16,32 fontFamily: 'Raleway, sans-serif',33 }}34 >35 <div36 style={{37 display: 'flex',38 flexDirection: 'column',39 fontSize: 36,40 alignItems: 'center',41 justifyContent: 'center',42 width: 800,43 height: 630,44 color: 'white',45 padding: 16,46 textAlign: 'center',47 }}48 >49 <h150 style={{51 fontWeight: 600,52 }}53 >54 {55 <span style={{56 textTransform: 'uppercase',57 }}>58 {title}59 </span>60 }61 </h1>6263 <p>64 marioaguiar.net65 </p>66 </div>6768 <div69 style={{70 display: 'flex',71 alignItems: 'center',72 justifyContent: 'center',73 }}74 >75 <img76 width={400}77 height={400}78 src={`${SITE_URL}/mariobw-og.jpg`}79 alt='Mario Aguiar'80 />81 </div>82 </div>83 ),84 {85 width: 1200,86 height: 630,87 }88 );89}9091export default handler;92
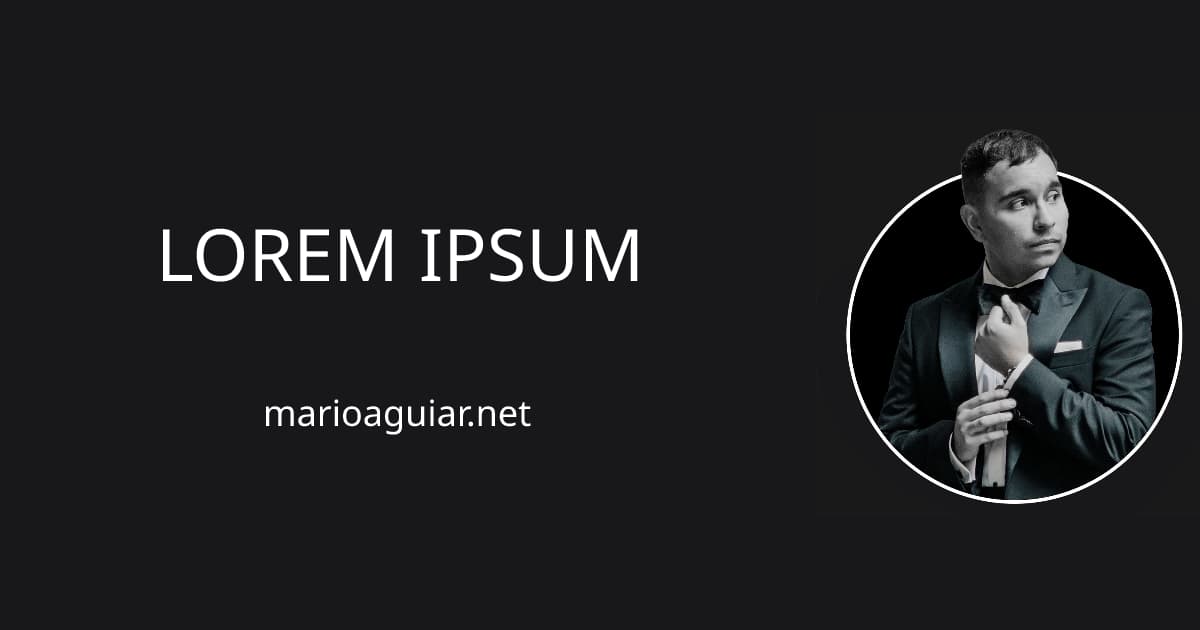
And finally, if we enter /api/og?title=lorem ipsum we will have our final result:
BONUS: IMPROVING TYPOGRAPHY
I honestly thought about finishing the tutorial here, but just before sitting down to write today, I discovered that in addition to some few styles we used, ImageResponse also accepts a slightly more basic version of typography editing, I don't know how recommended it is since you have to take into account performance issues, but I will still show you how it is done.
For this, it is necessary to have the font file somewhere on our server (or access to a cdn could also work.) Once we choose our font, we must load the contents of the file in Javascript, and pass it to ImageResponse in the configuration:
1/**2 * Next.js dependencies3 */4import { ImageResponse } from 'next/og';5import { NextApiRequest } from 'next';67/**8 * The img tag needs an absolute URL9 */10const SITE_URL = 'https://marioaguiar.net';1112/**13 * Necessary to avoid an error14 * when running in the Node.js runtime15 */16export const config = {17 runtime: 'edge',18};1920async function handler(req: NextApiRequest): Promise<ImageResponse> {21 const { searchParams } = new URL(req.url || '');22 const title = searchParams.get('title') || 'Mario Aguiar';2324 // Load the content of the typography in buffer.25 const ralewayBlack = await fetch( new URL('./fonts/Raleway-Black.ttf', SITE_URL) )26 .then((res) => res.arrayBuffer());2728 return new ImageResponse(29 (30 <div31 style={{32 backgroundColor: 'rgb(24 24 27/1)',33 display: 'flex',34 gap: 16,35 // We specify the typography to use.36 fontFamily: 'Raleway, sans-serif',37 }}38 >39 <div40 style={{41 display: 'flex',42 flexDirection: 'column',43 fontSize: 36,44 alignItems: 'center',45 justifyContent: 'center',46 width: 800,47 height: 630,48 color: 'white',49 padding: 16,50 textAlign: 'center',51 }}52 >53 <h154 style={{55 fontWeight: 600,56 }}57 >58 {59 <span style={{60 textTransform: 'uppercase',61 }}>62 {title}63 </span>64 }65 </h1>6667 <p>68 marioaguiar.net69 </p>70 </div>7172 <div73 style={{74 display: 'flex',75 alignItems: 'center',76 justifyContent: 'center',77 }}78 >79 <img80 width={400}81 height={400}82 src={`${SITE_URL}/mariobw-og.jpg`}83 alt='Mario Aguiar'84 />85 </div>86 </div>87 ),88 {89 width: 1200,90 height: 630,91 fonts: [92 // We add the data of our typography.93 { data: ralewayBlack, name: 'Raleway,' weight: 900 },94 ]95 }96 );97}9899export default handler;100
And with this, we will have a slightly more personalized typography:

CONCLUSION
And with this, we have finished, I hope this tutorial has been helpful to you, and if you have any questions do not hesitate to contact me. See you!